Friday, October 16, 2026

Vampire Survivors Local Co-op: Controller Setup and Beginner Tips

Two game controllers beside a miniature gothic castle and moon lamp in daylight.

Vampire Survivors supports local co-op for up to four players. Before your first group run, sort out who controls each survivor and how you will spot one another on screen. The official Steam listing confirms local co-op and support for keyboard, mouse, controller and touch input.
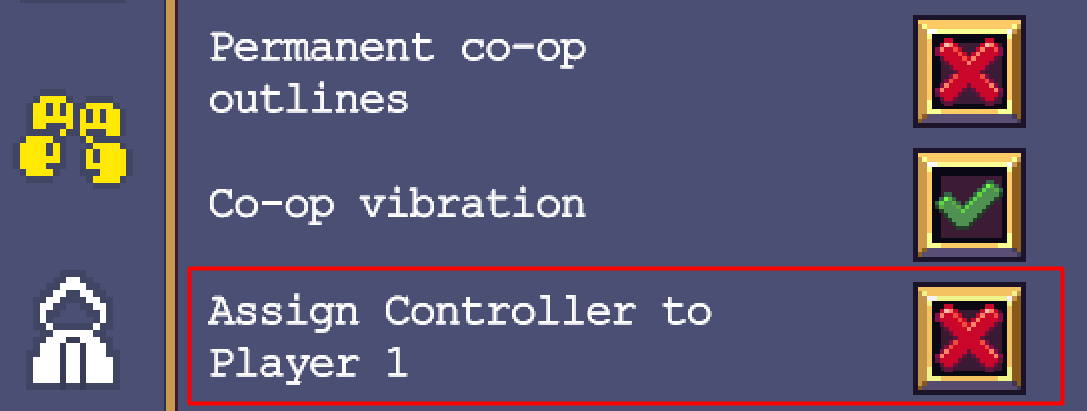
Vampire Survivors co-op settings with Assign Controller to Player 1 turned off
Official poncle screenshot: the red cross beside Assign Controller to Player 1 means the setting is off. This allows Player 1 to use the keyboard and Player 2 to use the controller. Tap to enlarge.

Set up keyboard and controller players

On PC, one person can use the keyboard and another a controller. In Options, uncheck “Assign Controller to Player 1” to give the controller to Player 2. Each player needs a separate input device; two people cannot share one keyboard. These are the instructions in poncle’s local co-op FAQ.

Connect the devices before choosing characters. Ask each person to press a direction while everyone else leaves their controls alone. If the wrong selection moves, fix the assignment before starting. Then repeat the test with all players present. A controller working in a two-person setup does not prove that your complete group is assigned correctly.

If a pad produces no input at all, use our PC gamepad troubleshooting checklist to separate a connection problem from a game setting. Change one setting at a time and test again, so you know which change helped.

Check the co-op settings together

The local co-op options include player outlines and cursor colours, permanent outlines, coloured selection arrows, and an option to take turns on treasure chests. Each survivor can only be selected once per run. See the developer’s control and character rules.

Before starting a local run
CheckWhat to do togetherReady?
Player assignmentTest one device at a time, then the full group.Yes / fix
SurvivorsAgree who gets a shared favourite before selection.Yes / fix
VisibilityTry outlines; confirm everyone can locate their survivor from their seat.Yes / fix
Treasure chestsAgree whether to enable the turn-taking option.Yes / fix
Run purposePick a familiar stage or a specific unlock to work towards.Written down
Stopping pointAgree whether you have time for one attempt or several.Agreed

Keep the answers on paper if you expect to play together again. Record the player count and input devices beside them. When someone brings a different controller next time, you will have a useful starting point for the setup check.

If the controller moves the wrong player

  1. For one keyboard player and one controller player, turn off Assign Controller to Player 1, as shown above.
  2. Ask the keyboard player to move while the other player leaves their controller alone. Then reverse the test.
  3. If both devices now control the intended characters, keep that assignment. If the controller is not detected at all, check its connection before changing unrelated gameplay settings.

I would test with two players first, then add the remaining devices one at a time. It makes a wrong assignment easier to trace. Give each player a different outline colour and check visibility during a crowded scene, not only on the selection screen.

For a remote session, use poncle’s online co-op rules: each player needs their own device and copy, and everyone needs the relevant DLC to use that DLC together. Local and online players cannot be combined in one session. Keep this distinction in the invitation so a friend does not arrive expecting to join from a second controller on your console.

Make the first attempt easy to discuss

Choose a small learning goal, such as keeping track of your survivor throughout a crowded encounter. Ask someone who knows the game to explain unfamiliar choices when they appear. Avoid turning every selection into a lengthy argument about an ideal build.

For early weapon choices, poncle’s starting tips on Steam recommend taking a few offensive weapons and concentrating upgrades on one at a time. Use that as a starting approach, then discuss what felt useful after the run. There is no need to agree on a complete loadout before anyone has played.

A defeated local player gets a coffin with a revival countdown; enemies staying on the coffin can interfere. More players also mean fewer weapon slots per person. Both rules are documented in poncle’s local FAQ. Tell new players about the coffin before the first defeat so they know what they are waiting for.

Use a separate plan for online friends

Native online co-op and couch co-op are separate modes. You cannot combine them in one session: every online player needs their own device and game copy. The current online FAQ also explains platform compatibility and DLC ownership. Check it before arranging a remote session; the older local FAQ still contains an outdated statement that official online play is unavailable.

After your local attempt, write down the setting that caused the most confusion and one change for the next run. Keep your control notes with our broader local co-op preparation checklist if you rotate between games.


Thursday, October 15, 2026

How to Run Old PC Games on Windows: Compatibility Checklist

A retro desktop computer with a blank CD case and a USB drive.

An old game page can tell you what a title was like without providing a working download for a current PC. Before following a link from an archive, look for the developer or legitimate store's current listing. Confirm the exact title and edition, then read the present requirements.

Treat a "free download" label cautiously when the surrounding article is many years old. It may have referred to a time-limited trial, an old promotion or an installer that no longer exists. Check the current store terms before calling the game free or telling someone else to install it.

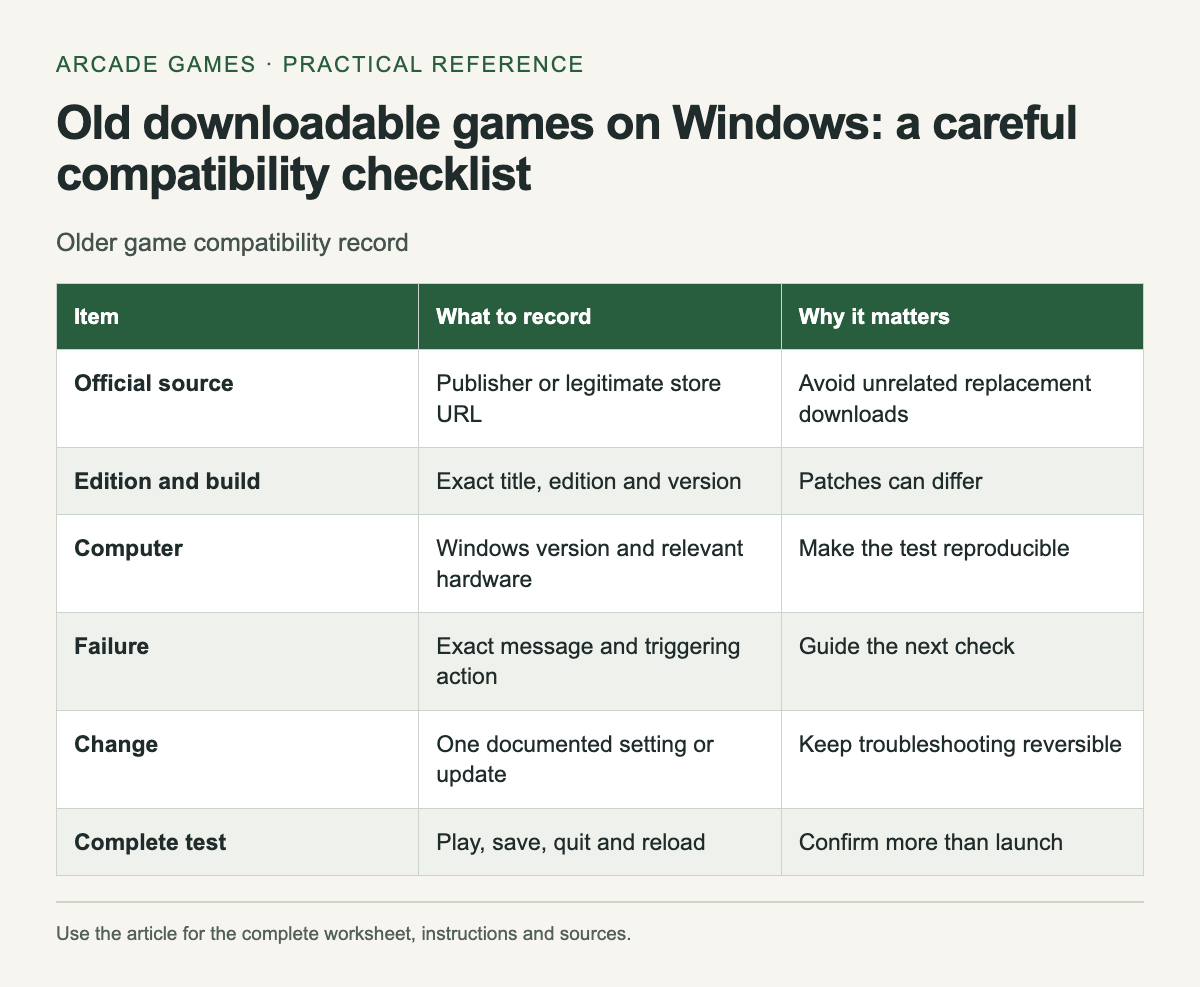
Older game compatibility record. The complete instructions and accessible tool follow in the article.
Reference graphic from this guide. The complete instructions and tool, where available, remain in the article.

Keep a compatibility record

Scroll the table sideways on a narrow screen to see every column.

Older game compatibility record
ItemWhat to recordWhy it matters
Official sourcePublisher or legitimate store URLAvoid unrelated replacement downloads
Edition and buildExact title, edition and versionPatches can differ
ComputerWindows version and relevant hardwareMake the test reproducible
FailureExact message and triggering actionGuide the next check
ChangeOne documented setting or updateKeep troubleshooting reversible
Complete testPlay, save, quit and reloadConfirm more than launch

Record the error exactly if installation or launch fails. "Nothing happens" is still a useful observation when paired with the action, game version and operating system. Do not replace it with a guessed diagnosis such as a missing library until there is evidence.

Start with the current publisher build

Microsoft's compatibility guidance recommends checking for an updated app or publisher version and using the Program Compatibility Troubleshooter when appropriate. Follow the current instructions for your Windows version.

A title's old minimum requirements are not proof of modern compatibility. They describe the environment the publisher listed, which may predate changes to Windows, graphics drivers or an activation service. Look for current support information covering the edition you can actually obtain.

Avoid guessing with replacement files

Do not download a loose executable or DLL from an unfamiliar site because a search result promises to fix the error. Use the game's installer, the publisher's patch or the relevant official runtime source when documentation identifies a requirement.

Keep security controls enabled. If the only suggested workaround requires disabling protection permanently or bypassing activation, stop and seek official guidance or a supported release. The goal is a playable game on a maintained system, not a chain of unexplained changes you cannot undo.

Test one change at a time

Write down the original setting before trying a documented compatibility option. Relaunch the game and repeat the same action. If the change has no effect, restore it unless the support instructions say to retain it for the next step.

A successful launch is only the beginning. Test normal controls, sound, a level transition and saving. Quit normally and reload. An old game that reaches its title screen may still fail at a display change or when writing its save.

Protect existing progress

Before reinstalling, find the publisher's documented save location or backup procedure. Uninstalling and reinstalling can affect data differently across games. Keep a copy only through a method you understand, and avoid overwriting the sole working save while testing an older build.

If the game uses an account or activation service, check whether that service still supports installation. A valid old receipt can be useful for support, but it does not establish that an abandoned service can be restored locally.

Keep the archive useful

When revisiting an old review, separate the historical description from current availability. A link that no longer works should be treated as a research lead, not an invitation to substitute an unofficial mirror. Search the exact title through its legitimate publisher or store.

After a successful test, save the working edition, Windows version and changes you made. That record makes a future reinstall easier and gives another reader a specific report to compare with their own setup. Avoid expanding one successful test into a claim that the game runs on every modern PC.

One historical title to research through its current official source is Cake Mania 3 archive entry.

How to Organize a Small Gaming Tournament

Four arcade controllers arranged around a trophy for a small tournament.

For a small game night, agree on the rules before building the bracket. Choose the mode, match length and what counts as a win. Then check whether the available time fits the number of players and stations you actually have.

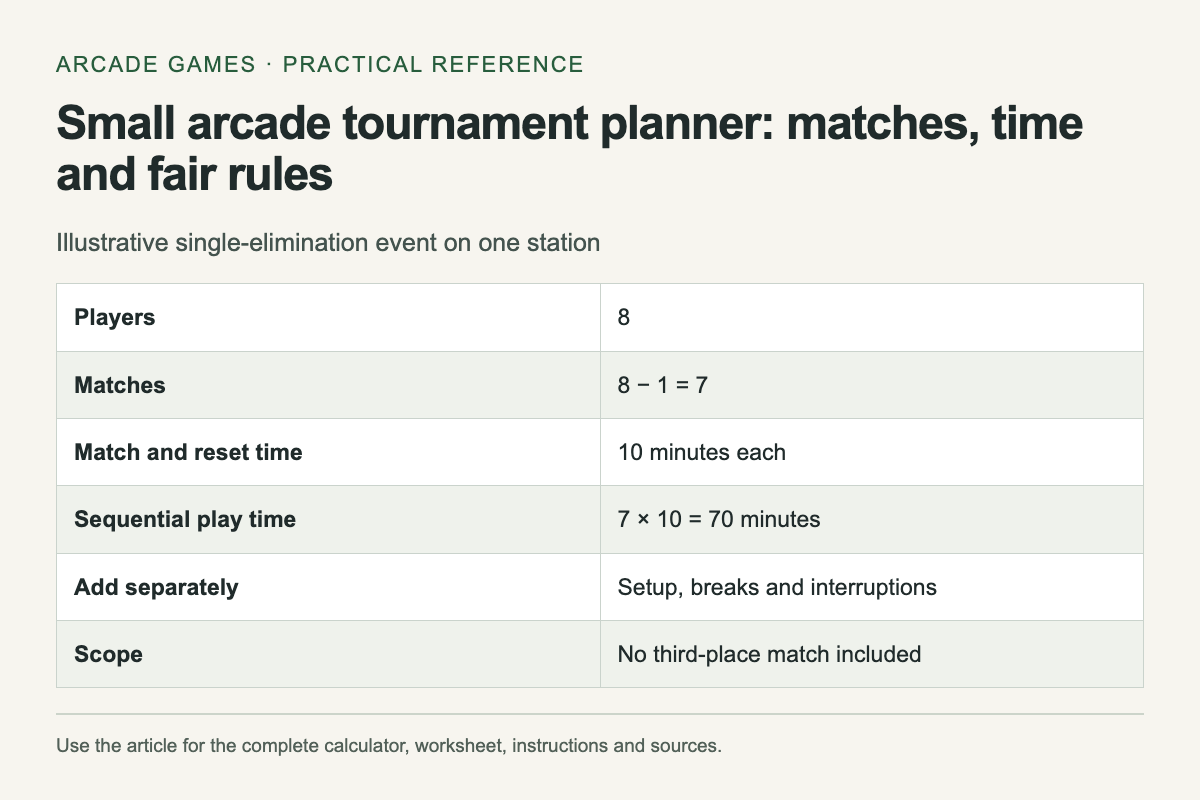
A single-elimination event needs one fewer match than players to produce a winner, provided each match eliminates one player and you do not add a third-place match. That relationship is simple enough to use on paper, and the calculator below does the arithmetic for a one-station schedule.

Illustrative single-elimination event on one station. The complete instructions and accessible tool follow in the article.
Reference graphic from this guide. The complete instructions and tool, where available, remain in the article.

Estimate the schedule

Estimate a small single-elimination event

Example: 8 players need 7 matches; at 10 minutes each on one station, allow 70 minutes plus breaks.

A single-elimination event needs players − 1 matches to produce one winner, without a third-place match. Sequential time = matches × minutes per match.

Calculations stay in this page. Nothing is sent or saved.

This is an estimate, not a live bracket generator. It assumes every planned match is completed and includes no draws requiring replays. Add time for explanations, breaks and delays before telling people when the final will begin.

Define a match clearly

Write down whether one round decides the winner or whether a match uses several rounds. If you enter ten minutes in the calculator, that should cover the complete match and normal reset time, including any extra rounds.

For a score challenge, specify whether everyone uses the same stage, starting settings and number of attempts. If the game has random conditions, decide whether the group accepts them or uses a supported common seed. Do not invent a fairness guarantee the game cannot provide.

Plan byes openly

A bracket is simplest with a power-of-two number of players. With another count, some players advance through an initial bye. Explain how those byes are assigned before the draw; random assignment is one ordinary option for a casual event.

A bye is not a played match, so it does not change the total number of eliminations needed. For six players, five completed matches still produce one winner. The shape of the first round changes, while the total follows the same arithmetic.

Leave people something to do

Single elimination is quick, but a player can be out after one match. If the group wants everyone to play repeatedly, consider a different format or reserve a separate casual-play period. Do not add a consolation bracket halfway through without updating the schedule and explaining its rules.

If you have several stations, some matches can run together. The one-station estimate will then overstate playing time, but the final rounds still depend on earlier results. Draw the dependencies before assuming that doubling the stations halves the whole evening.

Agree on interruptions and ties

Decide what happens after a disconnected controller, a pause or a technical crash. A short rule applied consistently is easier to accept than a new decision made after someone is losing. Keep a record of completed results before restarting equipment.

For a tied score, choose a replay or another supported tiebreak before play begins. Avoid a hidden rule based on speed or remaining lives unless everyone knows that metric counts. If spectators help, define whether advice is allowed during a match.

Publish only the useful record

A paper bracket or local note needs player display names and results. It does not need account credentials or personal contact information. Confirm with the group before sharing photographs or a public results page.

At the end, compare the estimated match duration with what actually happened. Use that observation for the next event, keeping setup time and playing time separate. The next schedule will be more useful because it reflects your chosen game and group.

For the blog’s earlier game coverage, visit The arcade blog archive.

How to Check Whether a PC Game Works Offline

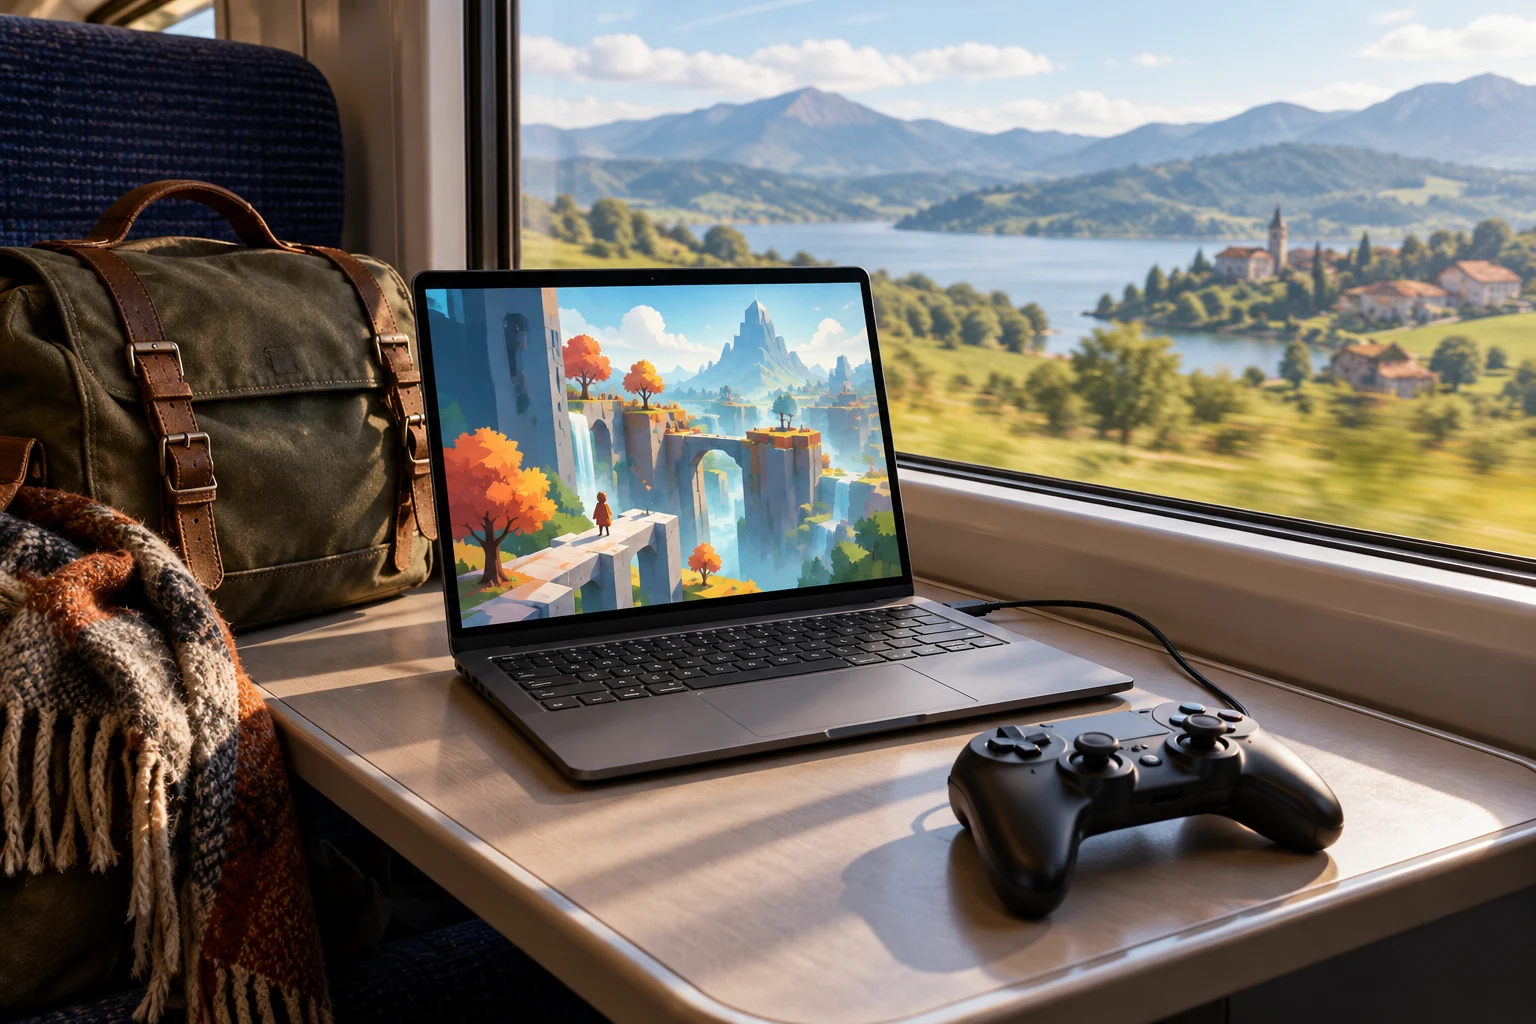
A laptop and wired controller on a train table beside a travel bag.

Test an offline game before you lose your connection. Installing it is only the first step: a launcher may need an initial sign-in, an update may be unfinished, or a particular mode may depend on a server. The useful test is launching and playing the exact mode you plan to use without the network.

Prepare on the device you will take. A successful test on your desktop does not establish that a laptop has the same files, account state or settings. Keep the preparation close enough to departure that you can verify nothing important changed afterward.

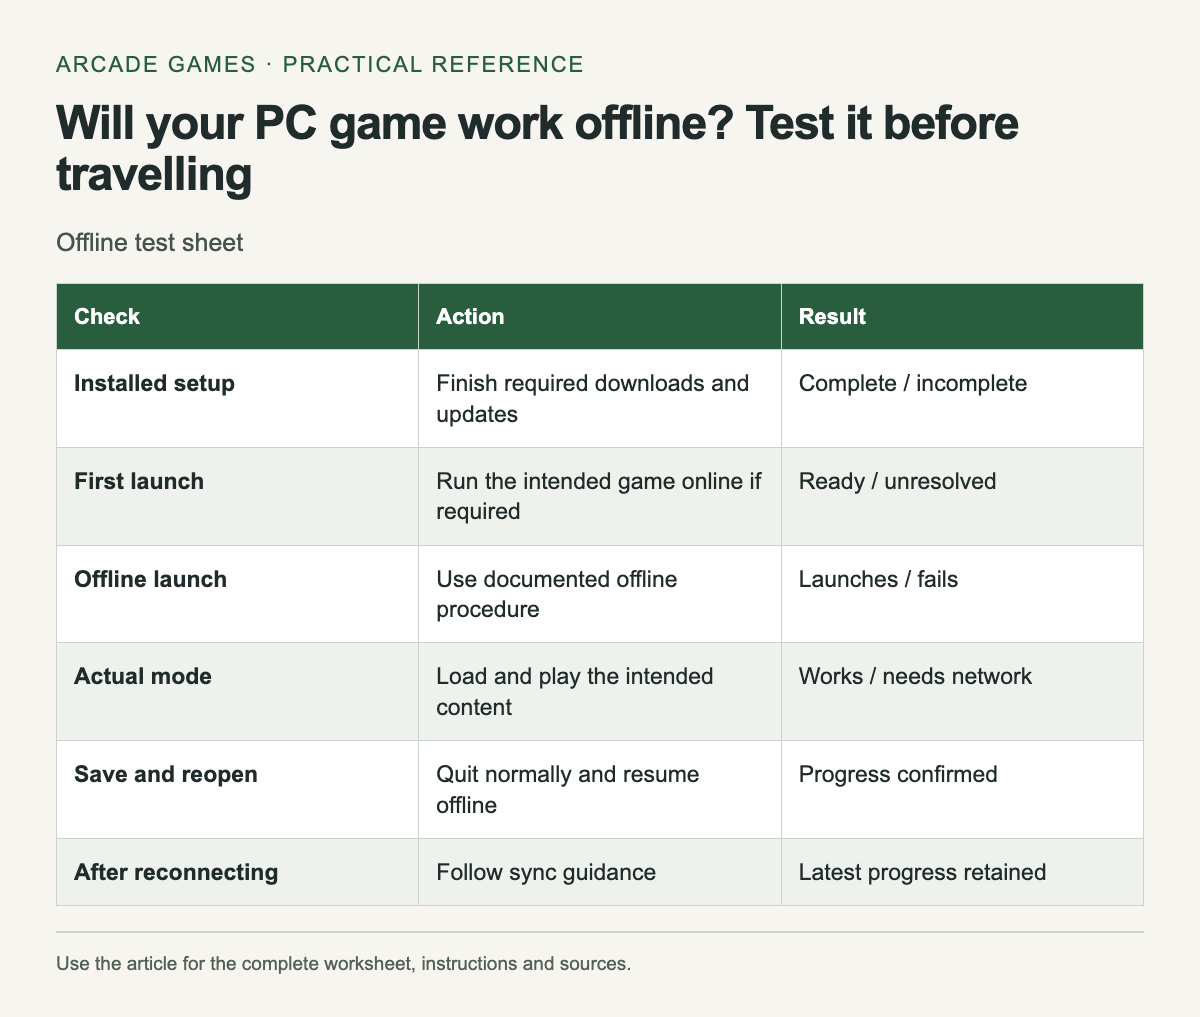
Offline test sheet. The complete instructions and accessible tool follow in the article.
Reference graphic from this guide. The complete instructions and tool, where available, remain in the article.

Make an offline-readiness record

Scroll the table sideways on a narrow screen to see every column.

Offline test sheet
CheckActionResult
Installed setupFinish required downloads and updatesComplete / incomplete
First launchRun the intended game online if requiredReady / unresolved
Offline launchUse documented offline procedureLaunches / fails
Actual modeLoad and play the intended contentWorks / needs network
Save and reopenQuit normally and resume offlineProgress confirmed
After reconnectingFollow sync guidanceLatest progress retained

Write a date beside the successful test. It describes a particular installed setup, not a guarantee that a future update will behave identically. If you update the game or client before leaving, repeat the launch check.

Finish the online preparation

For Steam, Valve's Offline Mode instructions say to start online, finish updates and launch the intended games to check for remaining installation requirements before going offline. Follow the current instructions in your client rather than relying on a remembered menu path.

Other stores and launchers have their own rules. Read them separately. Do not assume that a game's single-player label removes every account or activation requirement, or that a streaming service will work without a connection simply because the underlying game is single-player.

Test the mode you actually want

Continue past the title screen into normal gameplay. Start or load the intended save, use the controls and play a short section. If you want a specific challenge or expansion, include it in the check instead of testing only the base game's opening.

Try saving through the game's normal system, quit and relaunch while still offline. Confirm the expected progress returns. This catches a different problem from a game that merely refuses to launch.

Plan for more than one session

A trip may involve a restart or a depleted battery. Test a normal close and reopen so your plan does not depend on keeping the application suspended indefinitely. Keep enough storage for the game and its ordinary operation, and check the device's power needs separately.

Download any official manual or control reference you expect to need through a supported method. A useful support bookmark is less useful when the page requires a network you will not have. Keep essential notes locally without copying account secrets into them.

Keep online features out of the promise

Leaderboards, cloud synchronization and online multiplayer may be unavailable even when a local mode works. Record which mode passed rather than marking the whole game "fully offline." If an achievement or score upload matters, consult the game's documentation about what happens after reconnecting.

Do not bypass activation or install unknown patched executables to force offline access. If the documented setup does not meet your needs, choose another game whose supported mode you can test successfully before travelling.

Reconnect carefully

After the trip, allow normal synchronization to finish before continuing on another device. If a conflict appears, compare the available progress information and follow the platform's guidance. Avoid choosing an older copy merely because its timestamp looks unfamiliar after travel.

Keep the successful checklist for your next trip, then recheck it after significant changes. A five-minute launch-and-load test on the actual travel device is more informative than a broad list that labels games offline without naming the tested mode or setup.

When revisiting an older download, start from its current official availability; the archive includes Chicken Invaders 3 archive entry.

How to Back Up Browser Game Saves Before Clearing Data

A laptop running an original pixel scene beside a connected storage drive.

Before clearing browser data, find out where the game keeps your progress. A login, a visible score and a browser sync setting do not by themselves prove that the save exists on a server. Read the game's help page and look for a supported export or backup option.

Do this before trying a cleanup step to fix a loading problem. A general instruction to clear site data can remove the very local state you wanted to preserve. If the save matters, pause the troubleshooting long enough to establish a recovery path.

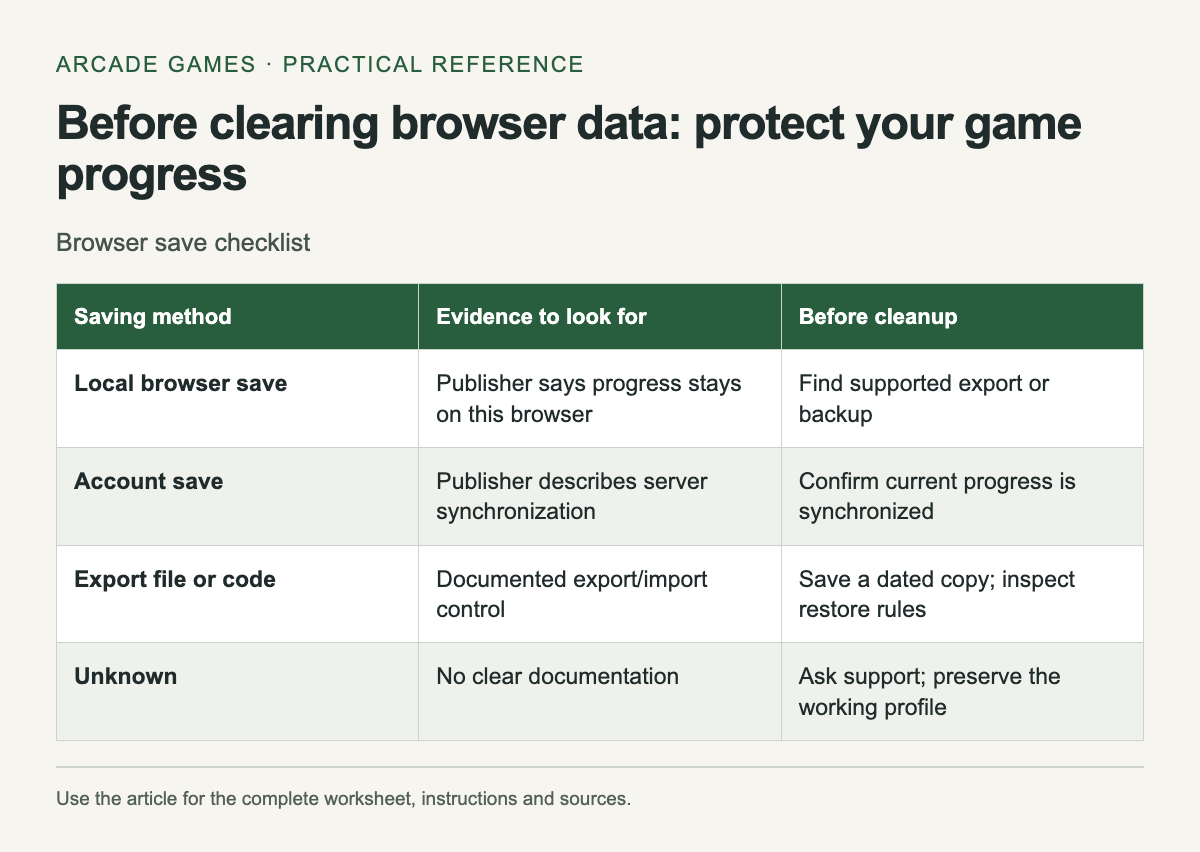
Browser save checklist. The complete instructions and accessible tool follow in the article.
Reference graphic from this guide. The complete instructions and tool, where available, remain in the article.

Identify the saving method

Scroll the table sideways on a narrow screen to see every column.

Browser save checklist
Saving methodEvidence to look forBefore cleanup
Local browser savePublisher says progress stays on this browserFind supported export or backup
Account savePublisher describes server synchronizationConfirm current progress is synchronized
Export file or codeDocumented export/import controlSave a dated copy; inspect restore rules
UnknownNo clear documentationAsk support; preserve the working profile

Mark the method unknown when the publisher does not explain it. Do not assume that signing into a game account automatically uploads every local save. Check what the account actually synchronizes and whether the current progress has reached it.

Keep site data separate from cached files

Mozilla's Firefox guidance distinguishes cookies, site data and cached web content, and provides ways to clear them. Read the options carefully. A broad deletion action can affect more than the temporary files you intended to remove.

The exact storage method belongs to the game. Browser games can use local storage mechanisms for progress, so use the publisher's instructions for that title rather than a universal cleanup recipe. A screenshot of a score documents the result but does not restore the underlying save.

Use an official export when available

If the game has an export function, follow its instructions and save the resulting file or code somewhere you can find it. Note the game version and date. Keep the export unchanged unless the publisher specifically documents how it can be edited.

Test import only in a supported way that will not overwrite the only working copy. Read whether importing replaces current progress. A backup you have never checked is still useful, but record that its restore behavior remains untested rather than calling it verified.

Check a move to another device

Open the publisher's account-sync instructions before switching. Confirm you are using the same game and account, then follow its documented synchronization steps. Similar titles on different portals may be separate versions with unrelated saves.

If the new device shows older progress, stop before playing further or forcing a sync. Read the conflict guidance and compare dates or progress labels where available. Choosing the wrong copy can make the situation harder to recover.

Protect the existing browser profile

Avoid deleting or resetting the profile that contains your only working progress. A private browsing session or another profile is not automatically a substitute for that state. Use an alternate profile only as a separate diagnostic environment, with the expectation that its data may differ.

If a site changes domain or the game moves to a new page, check whether the publisher provides migration instructions. Do not infer that a bookmark redirect also transfers the save. Keep the old address in your notes until the new version has the progress you expect.

Record the recovery path

Write down the game's exact URL, saving method and backup location. Keep account credentials out of a public worksheet. If support is needed, describe the visible progress and the action that preceded its loss without sharing passwords or recovery codes.

Once a reliable backup or account restore is confirmed, return to the specific troubleshooting step you intended. Clear only what that step requires, then reopen the game and check the result before making another change.

Older downloadable games use different saving paths; see The blog’s casual-game archive.

Arcade Game Practice Planner: Plan Short Training Sessions

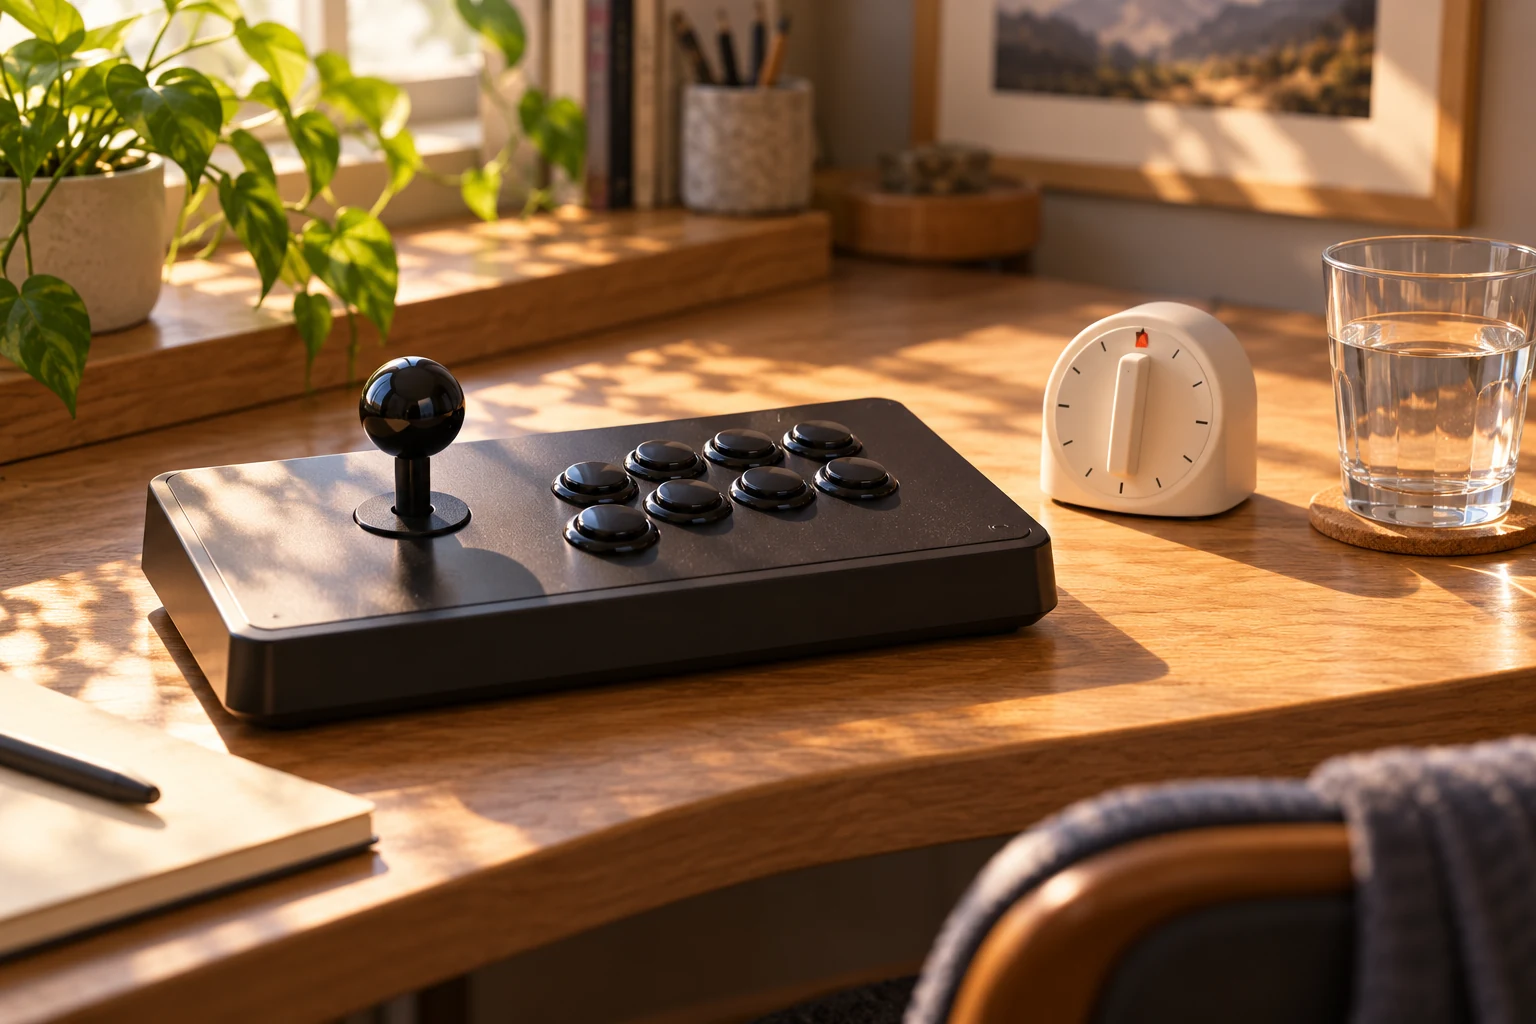
An arcade stick with a small timer and a glass of water.

A short practice session works better when you name the part you want to improve before pressing start. Choose a specific section or action: reaching the second stage with fewer losses, recognizing an enemy pattern, or completing a jump consistently. "Get better" is too broad to guide the next attempt.

Leave a little time between retries to record what happened. If you restart immediately every time, you can repeat the same mistake without noticing when or why it began. The pause only needs to be long enough to choose one adjustment.

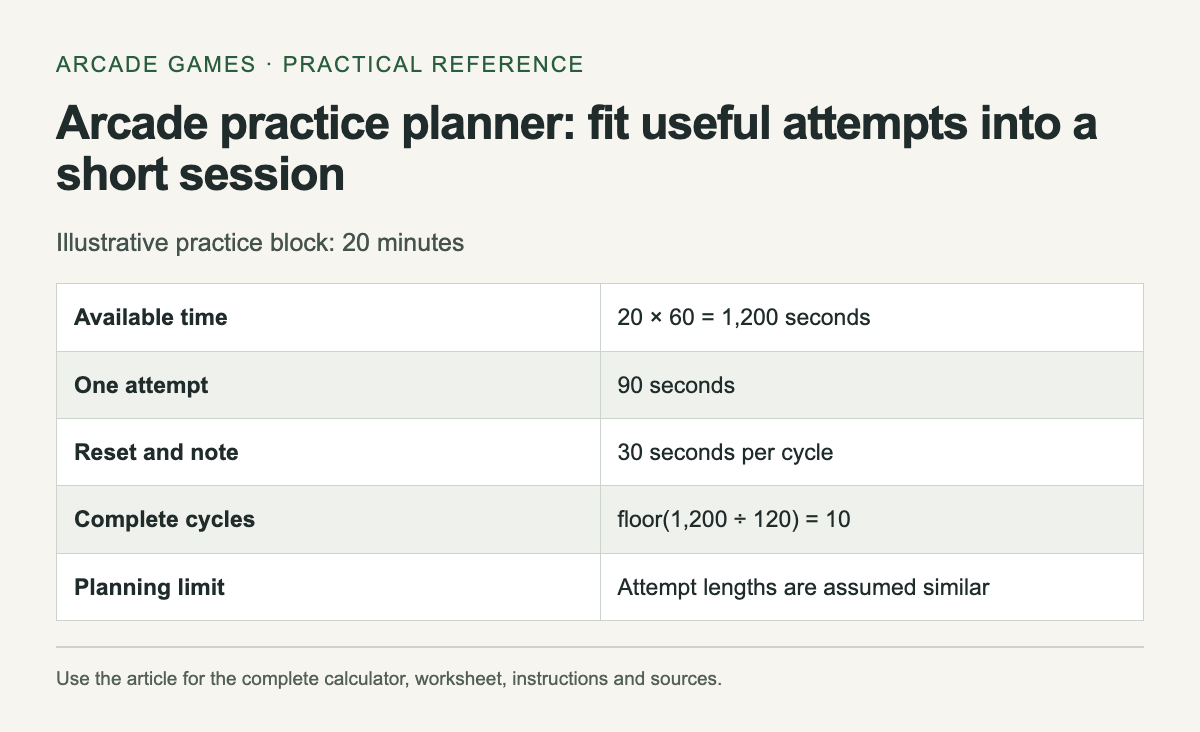
Illustrative practice block: 20 minutes. The complete instructions and accessible tool follow in the article.
Reference graphic from this guide. The complete instructions and tool, where available, remain in the article.

Estimate the number of attempts

Plan a short practice block

Example: 20 minutes with 90-second attempts and 30 seconds between them allows about 10 attempts.

Estimated attempts = floor(available minutes × 60 ÷ (attempt seconds + reset-and-note seconds)). This estimate assumes similar attempt lengths.

Calculations stay in this page. Nothing is sent or saved.

The estimate is a planning aid. Real runs can end early, menus can take longer and interruptions happen. If the result is zero, choose a shorter segment or a longer session instead of pretending you can fit a complete attempt into the available time.

Define a result you can observe

Use a target with a visible outcome. "Reach the checkpoint without losing a life" is clearer than "play smoothly." If the game offers a practice or stage-select mode, check its rules before assuming the segment matches a full run.

Keep the difficulty and control setup stable while testing a particular tactic. A changed input layout can be a useful experiment, but it belongs in its own block so you can tell what affected the result.

Separate learning from record attempts

During a learning block, you may deliberately try a slower route or inspect a pattern. That can reduce the score while giving you information. Do not judge every experimental run by whether it beats your record.

During a record block, use the setup and route you chose, then record the score with its rules. Mixing the two kinds of attempt can make a useful practice session look unsuccessful simply because the highest score did not move.

Review a small number of runs

After a few attempts, look for a repeated problem. If each failure happens in a different place, the target may be too broad or the game may introduce changing conditions. Narrow the task to one section where you can compare decisions.

Write the earliest mistake that affected the rest of the run. Losing the final life may be the visible ending, but the useful adjustment could involve a resource spent much earlier. Keep that link tentative until another attempt supports it.

Change one decision

Pick one adjustment for the next block: wait for a different opening, take a safer route or use a resource earlier. Leave other choices alone when possible. A single change makes the result easier to understand, even when it does not immediately improve your score.

If frustration or fatigue makes the task unpleasant, stop or switch to ordinary play. The calculator does not set a quota you owe the session. A record of five attentive attempts can be more useful than a longer list made while you no longer care what happens.

End with a return note

Write the tactic you want to repeat and the one question still unresolved. Save it beside your score log. Next time, you can begin with the chosen task instead of spending the opening minutes remembering what you intended to practise.

The form does not store your plan. Copy the estimate into your own notes if it helps, then adjust the attempt duration after observing a real session. Keep the estimate labelled as an estimate; it cannot predict the length of a run you have not played.

The same focused practice idea can apply to a timed casual game such as the archive’s Cake Mania archive entry.

PC Controller Not Working? Gamepad Troubleshooting Checklist

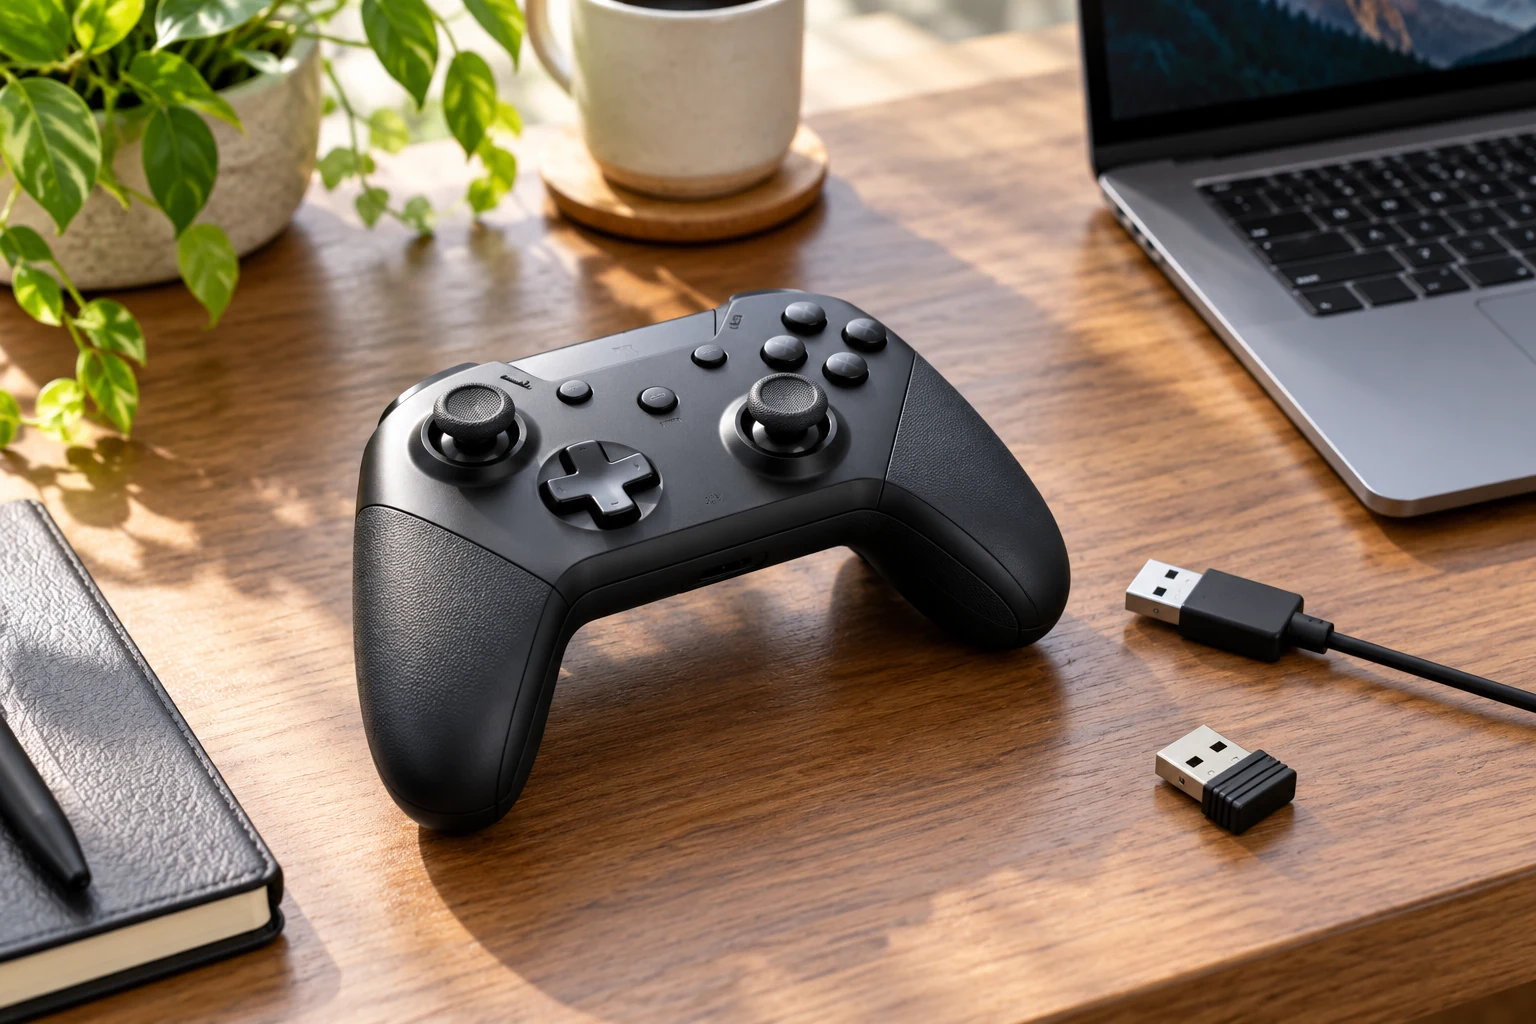
A gamepad beside its USB cable and wireless receiver on a desk.

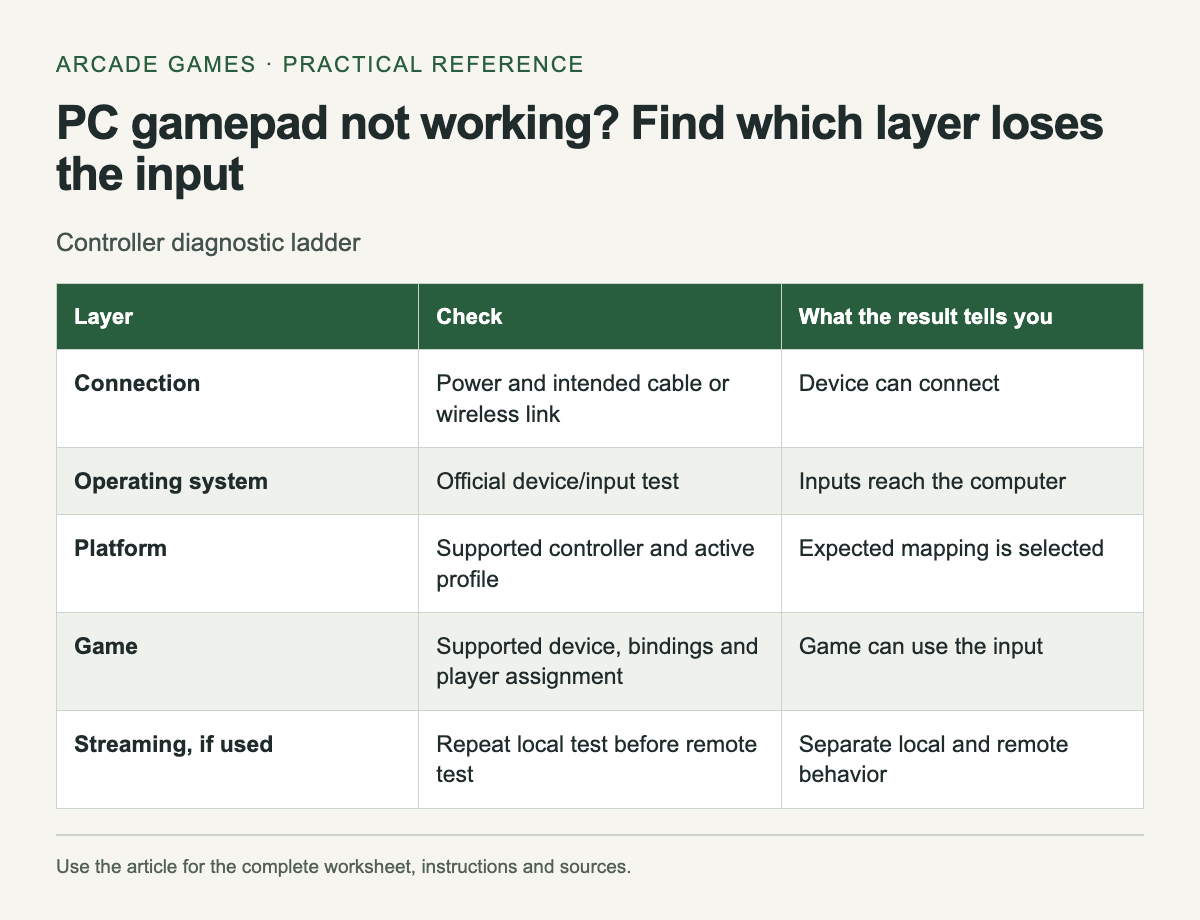
When a controller fails in one PC game, first find out where its input stops being recognized. The device connection, platform configuration and game bindings are separate checks. Changing all of them at once makes it harder to identify the cause or return to a working setup.

Start with a simple description: no buttons respond, one stick behaves incorrectly, or a single press moves a menu twice. Record the controller model, connection method and game. The exact symptom is more useful than a general note that the gamepad is broken.

Controller diagnostic ladder. The complete instructions and accessible tool follow in the article.
Reference graphic from this guide. The complete instructions and tool, where available, remain in the article.

Follow the input through the setup

Scroll the table sideways on a narrow screen to see every column.

Controller diagnostic ladder
LayerCheckWhat the result tells you
ConnectionPower and intended cable or wireless linkDevice can connect
Operating systemOfficial device/input testInputs reach the computer
PlatformSupported controller and active profileExpected mapping is selected
GameSupported device, bindings and player assignmentGame can use the input
Streaming, if usedRepeat local test before remote testSeparate local and remote behavior

Stop when a layer fails and investigate it before continuing. A controller that is absent from the operating system cannot be fixed by changing an in-game jump binding. A controller that works elsewhere may still need a game-specific configuration.

Check the physical connection

Confirm power or battery charge, then inspect the connection you intended to use. If you test a cable, use one known to support data as required by the device. A cable that charges a controller does not by itself establish that it carries the input connection you need.

Disconnect extra controllers during the test if doing so does not interrupt someone else's session. This makes player assignment easier to understand. Reconnect the intended devices one at a time and note when the symptom appears.

Use the manufacturer’s diagnostic path

Open the controller or platform's documented input test when available. Check buttons and stick movement separately. If the diagnostic does not show the expected input, follow official connection or firmware guidance for that exact model.

Avoid installing a collection of remapping tools to see whether one works. Several active mapping layers can complicate the result. If you already use one, record its profile and close or disable it only through its normal controls for a reversible test.

Inspect the game’s supported controls

Read the exact store page and game manual. Controller support can vary between gameplay and menus, and a familiar button icon does not prove that every device is supported. Check the game's own device requirements before interpreting a missing prompt.

For a streaming session, the host and client add another part to the path. Steam's Remote Play explanation describes sharing input with the host. Test the controller locally first so a network or streaming issue is not confused with a device issue.

Make one reversible change

If official guidance recommends a platform input setting, write down its original value before changing it. Restart the game when the instructions require it and repeat the same test. Keep the change only if it addresses the symptom without breaking another needed action.

For double input, inspect whether more than one active configuration sends commands for the same button. That is a possibility to investigate, not a diagnosis you can make from the symptom alone. The game itself may have a repeat rule or a binding conflict.

Prepare a useful support report

Include the game version, operating system, device model, connection and the earliest layer where input failed. Add the exact action and expected result. A short recording of the controls can help if it avoids showing account details or other private information.

When the controller works, keep the successful configuration note. Reapply only those settings after a reset instead of repeating every experiment. The point of the checklist is to narrow the fault enough that the next change has a clear reason.

When revisiting an old arcade title, begin with its documented controls; the archive includes Chicken Invaders 3 archive entry.